Showing posts with label classes. Show all posts

Monday, July 27, 2015

I Built a Garden Chair!

I don’t even pretend to be handy with tools. I can use a screwdriver, a drill, and when hard-pressed, a miter saw. Don’t even ask me to lift, let alone try to use, a chain saw. I built my own raised beds and pyramid-shaped trellises, with some assistance, but that is the extent of my tool usage. So when Longwood Gardens was offering a “Build a Wave Hill Chair” workshop in June, I admit I was a bit intimidated. Would I make a fool of myself by drilling backwards instead of forwards? Would I end up with a chair that looked more like something out of Dr. Seuss than a chair that you would find at the gorgeous Wave Hill garden in NY? I decided to take a chance.

To be honest, I have yet to go to Wave Hill. Hard to believe when it really isn’t a long drive for me to get there. However, I did see the Wave Hill chairs at Margaret Roach’s garden in NY when I went there for a Garden Conservancy Open Day. Margaret has several of the chairs throughout her garden.


They are surprisingly very comfortable. We sat in these chairs by the meadow garden for awhile.


You can either paint them, or let them weather to a gray color. These are obviously painted.


I thought it would be nice to have one of these lovely chairs in my garden. So I gathered up my tools, took a deep breath, and hoped for the best.

Our instructor was Dan Benarcik. Dan is a horticulturist, writer, public speaker, furniture builder and an enthusiastic, helpful teacher (there may be more he would add here, he seems like a modern Renaissance Man). He sells pre-built chairs and kits online, as well as doing workshops. He told the class that we may feel nervous and apprehensive at first, but he promised we would have fun and go home with a successfully built chair. He was right!

The wood is pre-cut to size and was set up in stations around the room. He also had three or four stations of wood jigs set up to help with assembly (I really should’ve gotten pictures of the jig stations!). Groups of us lined up at each station and assembled one part of the chair at a time. Believe it or not, this eventually becomes a chair...


The chair is held together with wood glue and screws. Hardly any holes were pre-drilled, we just drilled directly into the wood. Most of us ended up working in groups of two or three, helping to hold parts while the other person drilled. It really ended up being a team effort.


Each of us walked out of class with a finished chair and a smile on our face. I really had a blast and felt pretty good about holding my own with my drill. (In this photo you can see a metal jig that we used at one point.)


Getting my finished chair home was a bit of challenge in my small Scion TC hatchback with its shallow trunk. With some help from a Longwood Gardens staff member, I ended up getting it to fit in the passenger seat.


Family and friends have oo’ed and ah’ed over what appears to be some decent handyman skills, but I know the truth. It was all because of some pre-cut wood, jigs, a good teacher, and some team work.


Originally I had thought I might paint my chair, but Dan mentioned how it is more difficult to paint it and maintain the nicely painted look. I am all about not needing more to maintain in my garden, so I am going to let my red cedar chair age to a dusty gray. That way it will match the cedar garden bench and raised beds that are in the kitchen garden.


The best part of building your own garden chair is getting to relax and enjoy sitting in it with a refreshing beverage after a hard day of weeding.


So if you want an elegant, comfy garden chair, and a chance to impress your friends and family, take a chair building workshop. Thanks Dan! I absolutely love my new chair!

Sunday, March 1, 2015

Kokedama Class

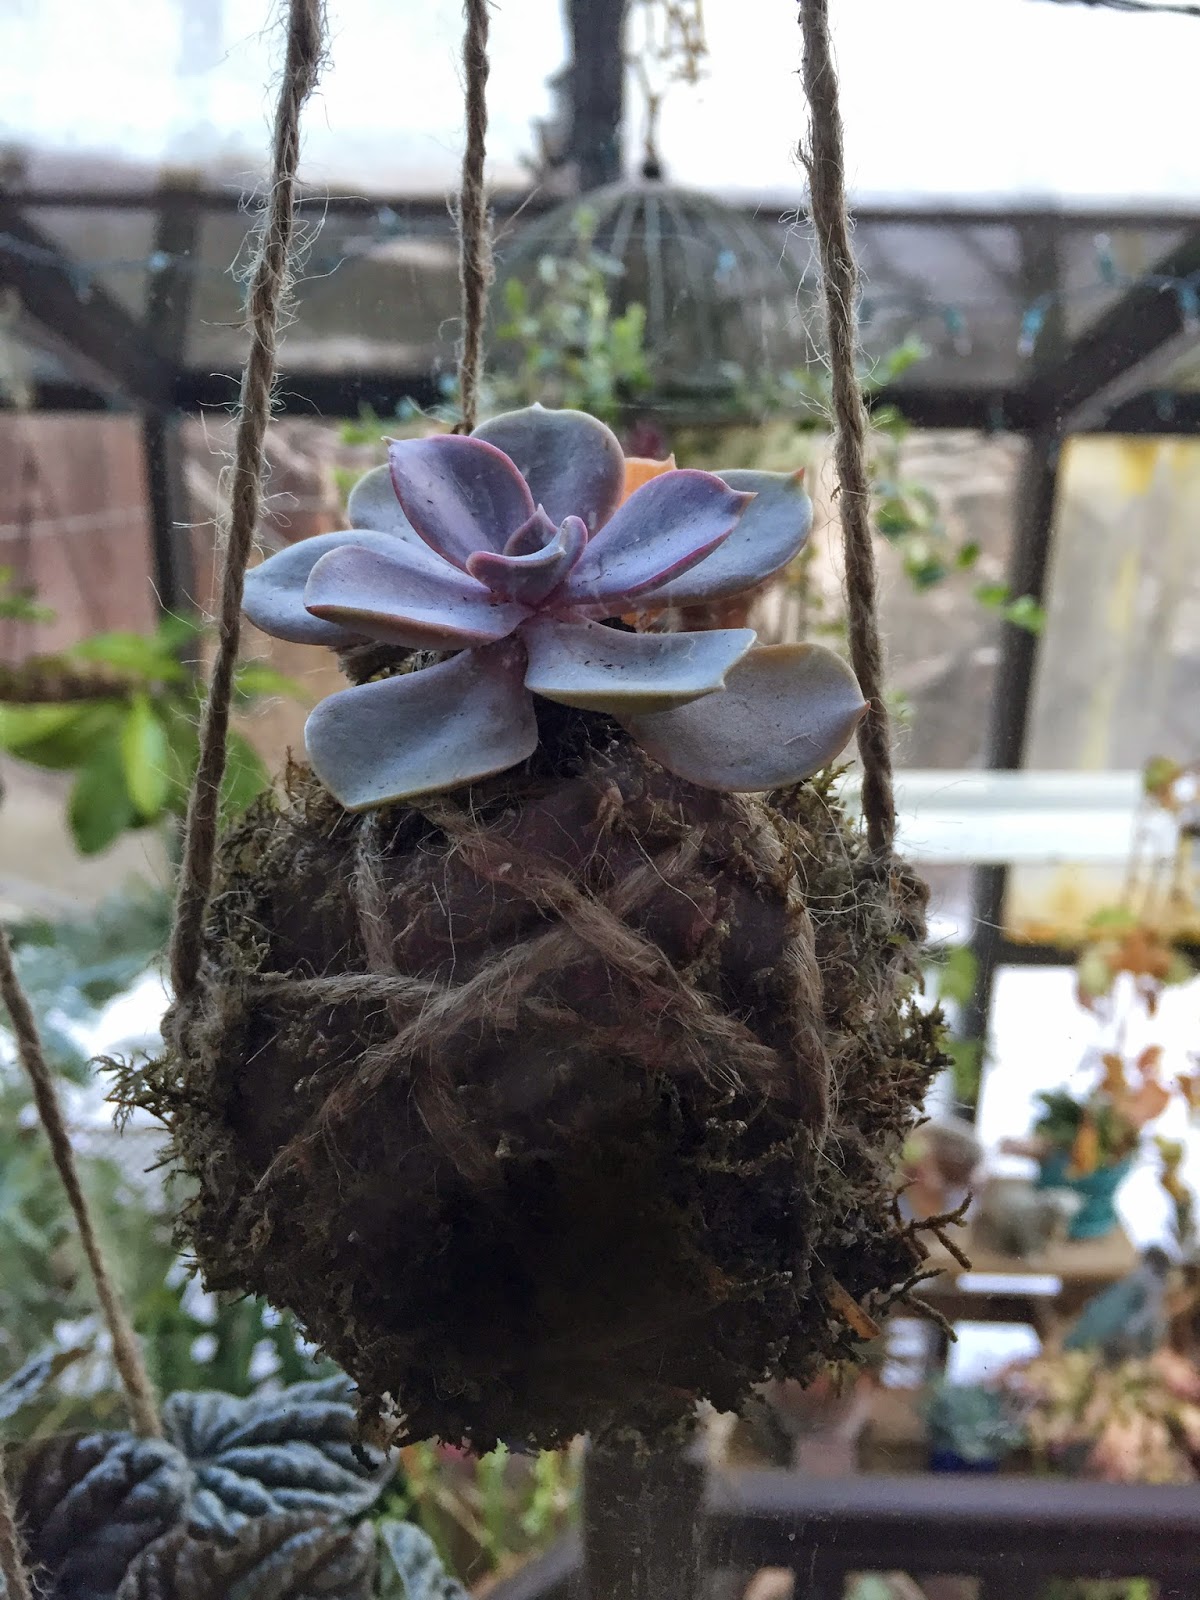
Yesterday I took a class at Longwood Gardens called Kokedama String Gardens. The Japanese word “Kokedama” means “moss ball.” Moss balls can sit in a dish or be strung up to hang. In class we learned how to construct a moss ball and hang it.


The class was taught by Longwood Senior Gardener Lauren Hill. Lauren’s infectious personality made for a fun class. It was like combining arts and crafts with gardening. I loved it!

Kokedamas do not live very long, maybe a year or two, due to the small area for the root system, as well as due to the fact that these moss balls dry out quickly. Plants that do best in this situation are ones that can take it on the drier side.

The plants we used in class were (left to right) Peperomi caperata (Peperomia), Echeveria (Mexican Hens and Chicks), and Phalaenopsis hybrid (Moth Orchid). Some people had Hoya carnosa ‘Tricolor’ (Wax Plant) instead of the Peperomia.


Here are the steps we followed in class to create our Kokedama:


STEP 1: Take the plants out of their pots and take most of the soil off and loosen the roots.

STEP 2: Form a soil ball using a wet soil mix. Squeeze out excess water. Lauren had prepared the wet soil mix ahead of time: a half and half mix of field soil (referred to as garden soil if you are looking to buy it in a bag at your local nursery or box store) and potting mix soil. The garden soil is denser and helps the soil hold together in a ball form.


STEP 3: Open up the soil ball using your thumbs and then nestle the plant in and reform the soil ball around the plant’s roots. (This is trickier than it sounds and messy, too!)

STEP 4: Spread out a “sheet” of moss on the table, put the soil ball on top and then wrap the ball like a package with the moss. Leave some soil at the top where the plant is to help with watering. Any type of moss will do as long as it isn’t in pieces and is more like a sheet of moss stuck together.

STEP 5: Cut a long piece of string and wrap it around the soil ball. Leave a long enough piece at the beginning so you can use that to tie it. Be sure to wrap all sides and the bottom of the ball enough to hold it together, then tie tightly.


STEP 6: Trim up any loose moss hairs that are sticking out.

STEP 7: At this point you can leave it as is and use it in a dish as a table decoration or you can tie it for hanging. I tied mine for hanging. Some people created a type of hammock out of the string and others, like myself, cut two or three separate strings to attach to the strings of the ball. Those three strings are then tied together at the top and attached to another looped string for hanging.

STEP 8: Hang your Kokedama and enjoy it! It is best to hang them on a hanging plant hook or S hook so you can easily remove them for watering. Kokedamas seem to look best in groupings of three hung at different lengths. For now I have mine hung in one of the greenhouse windows, where I can see it from the family room. I wish I could hang these in the bay window of the family room, but am too afraid my cats would think they were cat toys!


STEP 9: To keep your Kokedama living as long as possible, they need to be soaked in a bucket of water with a small, diluted amount of house plant fertilizer once a week.

I have so much fun learning new ways of working with plants. From Kokedama class to crevice gardening, vertical gardening, and carnivorous plants classes – they all sparked a new interest and fun way of gardening for me. Can’t wait to try some of these on the front and back porches in the warmer weather. Seems like a fun and different way to display some interesting annuals or succulents come spring and summer. Can’t wait!


For some fun Kokedama ideas, check out Pinterest. Or Google “Kokedama” to find some online tutorials.


Friday, February 27, 2015

Trying to Beat the Winter Blues

It’s still winter. It’s still cold. And we have finally been getting the snow they had predicted we would get this year, although granted, NOTHING compared to last year. But boy, this cold. This bitter, bone-chilling, breath-taking cold. It is completely unbearable to me. I can’t imagine having tons of snow on top of that like they have had in Boston and other New England areas. We have a distant relative who lives in Maine who sent photos of the many feet of snow surrounding their house and I said I would’ve died by now from cold and snow. You would’ve found me buried in a snow drift frozen to the bone. Thank goodness we haven’t had to deal with that. Waking up to a 1 degree temp with wind chills below zero is hard enough for me to deal with – even with the three layers of clothes I seem to have to wear every day just to feel comfortable. When will it end?


Despite this incredible cold (sixth coldest winter on record, I heard), I still see plenty of birds at the bird feeders. Shouldn’t you guys have gone south for the winter? None in this photo, but trust me, I have seen as many as 20 birds at one time all vying for a bite to eat.


Even my garden statue, Winnie, wishes she had gone south for the winter so she wasn’t wearing a snow-cap like she has been lately.


Surprisingly, I still see tracks from my neighbor’s cats throughout the yard. It is interesting that even with the snow on the ground, they still seem to follow the path through the garden.


So how does a gardener get through a miserably cold, gray, drab winter like this? We think SPRING! We look forward to when we can dig our trowels in rich soil, plant our seeds, and watch them grow. We dream of all the marvelous veggies we can grow this year, and might even contemplate trying Brussels Sprouts for the first time. There is warmth in dreaming. In planning my veggie garden this year, I came to a conclusion. I have decided to use as much organic seed as possible. Why? Well, I garden organically so it seems like organic seeds would be more adapted to that since they come from plants that were grown organically. Plus, it is just one more thing I can do to help the environment – less chemicals means a happier environment (not to mention it helps our oh-so-important-pollinators). Hudson Vally Seed Library is one source I have used in the past and will use this year, as well. It certainly helps that I love their Art Packs packaging, too. I AM a sucker for pretty packages. Seeds of Change and Seed Savers Exchange are two others I am looking at using this year.


Ha! Sorry about some of the upside down seed packets in that shot. Must have been tipsy when I took that. :o)

This gardener also looks for other ways to scratch that gardening itch this time of the year. That’s where garden classes come in handy. I took a class on Crevice Gardening at Longwood Gardens recently. They have such awesome classes and I was looking to learn more about alpine plants. Oh what fun putting on the garden gloves and playing in the soil for a day.


If you don’t know what Crevice Gardening is, well it is basically a type of rock garden where you grow plants in between vertical slats of stone. Longwood Gardens is working on restoring their fountains and some of the rocks in this planter (the lighter colored ones) are pieces from the fountains that couldn’t be used in the restoration. We had a choice of using a container made from the pieces from the fountains or a lighter weight one, and I would’ve loved to have used the one constructed from the fountain pieces, but it was well over a 100 pounds even before planted and well, after three elbow problems and a rotator cuff issue, I like to hope I learned my lesson about trying to lift more than I should. So I stuck with the lighter weight container. I would love to tell you what plants are in here, other than the obvious Hens and Chicks, but the plant tags are stuck inside the container, which is currently outside in the snow. However, I did cover it with plastic – to protect not just the plants, but the container as well, from freezing in this drastic cold. They are all plants that don’t require a lot of space or nutrients to grow and should fill in. We shall see how it does. If you are interested in learning how to create a Crevice Garden, you can check out a video by a lovely-sounding British lady wearing Wellingtons named Christine Pritchard on YouTube.

Soon I will be at Longwood Gardens again, this time for a class on Kokedama (hanging string gardens). Soooooo looking forward to that. Google it to see what they look like. Just found a YouTube video on that, too.

Another way I am combating the winter blues if by tending to the greenhouse plants and creating some air plant containers, like this one I put together in a jar and have sitting in the kitchen window. I saw this red air plant at the Longwood Gardens gift shop and fell in love with the color. I already had the jar at home, as well as gravel, moss and tiny little pinecones.


Next on the “Beat the Winter Blues List,” the Philadelphia Flower Show. Although I have a beef with this year’s show. It has been advertised as “Celebrate the Movies.” It wasn’t until I went to their website that I saw it isn’t movies in general, it is Disney and Disney Pixar movies. Really??? Why didn’t you call it “Celebrate Disney and Pixar Movies” then? I’m feeling slighted and I haven’t even seen it yet. I will try to reserve my judgment until AFTER I have seen it, though. It does seem like false, or at the very least misleading, advertisement to me, though. The flower show is always a treat for me and I feel lucky to have such a wonderful show within easy driving (or train ride) distance, so I will try not to complain.

While I wish for winter’s end and hope for those sprouting spring seedlings, I know I’m not quite ready yet. Been way too busy with homework for my evening web design classes, plus extra work at my day job that keeps me way too occupied and fries my brain. Still working out my kitchen garden plan for this year, still figuring out what other seeds to buy. Must get on that because spring will be here before we know it. Oh spring, how I love thee.


Wednesday, June 4, 2014

How to Dress Up a Dilapidated Fence and Feed a New Vertical Gardening Obsession All at the Same Time

A few weeks ago I posted about a class I took at Longwood Gardens on vertical gardening and how it fueled a new addiction. It made me buy this cool wine crate vertical garden panel from gsky. It has helped me further dress up this crappy old fence that is falling part.


I had already posted about the hanging terra cotta pots where I used plate hangers to hang them. I had originally thought I would make wood frames to hang around them, but didn’t really leave enough room up top to do that. Maybe next year. I think the vertical garden panel looks nice here and helps distract from the dilapidated old fence.

 
What’s cool about this system is that you keep the plants in their pots and just slip them into the panel, all easy peasy like. It is what I referred to as the “plant-in-pot” system in my other post. In the photo below I took out a couple of the pots so you can see. This system makes it easier to water and to change out any plants that might get too big or die.


This is a shady area, so I stuck with shade-loving plants. They are not all hardy, but I plan on bringing it into the greenhouse in the winter. The plants I used are four Maindenhair Ferns, one ivy (bottom middle), one Blue Star Fern (very middle), one Aurora Begonia (top middle), and two other kinds of Rex Begonias on the middle left and right, but the tags didn’t say the names. All of these are plants that look great on their own, but mixed together vertically they look even better. It will be interesting to see how they fair throughout the summer and fall.

Here is an update to the vertical panel of herbs that we planted in the class I took. I had kept it horizontal for a couple of weeks to help it root-in. Now it is hanging on the neighbor’s ugly, white, vinyl fence at the very back of my yard, in the Kitchen Garden. Again, a nice way to dress up a not so awesome fence. I didn’t want to drill any holes into a fence that doesn’t belong to me, so I used wire to hang it from the post.


And since we’re talking about the fence, I also hung my succulent wreath on it that I had made in a class at Meadowbrook Farms in April (I had posted about that, too). I let this root-in horizontally for about a month and a half. I also used wire to hang this from the post.


So there you have it, fun with hanging/vertical garden stuff. Now where else can I add some vertical interest? Hmmmm....


Monday, May 19, 2014

Succulent Wreath Class at Meadowbrook Farms

Back in April I attended a succulent wreath class at Meadowbrook Farms, which is owned by the Pennsylvania Horticultural Society. I had been investigating creating a succulent wreath and had found some different ideas on how to go about it, but when I saw this class listed I thought it would be a fun way to learn about it.

There was a writer from the Philadelphia Inquirer there, so if you subscribe you might have seen the article or can view it online. (I’m actually in the photo of the group at the round table – thankfully small and not too noticeable.)

We started with a pre-soaked sphagnum moss wreath that had wire and a hanger. Surprising, it looks like you can actually buy these on Amazon. We were given hardy sempervivum plugs (small plants). Basically you plan (or not plan) where you want your different semps to go, then use a knife, or just your fingers, to dig a hole into the moss wreath and put your plug in. Make sure it is deep enough so it will root in well and not fall out when hung. You can use toothpicks to angle or anchor plants in. The wreath should be kept flat for at least a month to help the plants root-in.

Here is the succulent wreath that I created in class, although I admit I added in a few other succulents (the spider-web looking ones). The wiry looking things are sedums that they gave us in class and I don’t think those work very well since they get very “leggy.”


My succulent wreath will need full sun when it is ready to hang, or else the semps will get straggly.  Any plants that die can be replaced. The wreath should be watered when it is dry and hard to the touch. It is best to lay it on the ground to water. We used hardy semps, so this wreath could be left outside in a covered area during the winter, however, I may bring mine into the greenhouse to overwinter.

This succulent wreath not only could be hung on a gate, wall, trellis, or fence, but it could also be used as a centerpiece on a patio table, with a candle in the middle, or to cover up an ugly tree stump.

It was a nice group of people and a lovely day to spend crafting a succulent wreath. A good source for succulent plugs is Simply Succulents. You also may be lucky enough to find some in Lowe’s Home Improvement store.


Vertical Gardening Class at Longwood Gardens

On May 10 I took an awesome class at Longwood Gardens called “Vertical Gardening,” presented by Longwood employee Lorrie Baird. Longwood has some really excellent classes and this rates as one of my favorites, along with a class I took on carnivorous plants a few years ago. Both classes taught me something new and sparked a new interest.

The class focused on different types of “green walls” or  “living walls” and the advantages and disadvantages of each type. Here is a sample of a living wall that is at Drexell University in Philadelphia – they call it the Biowall.

Here are the different types of living walls:

Type 1: 


Plant-in-Pot-Systems use plants in their growing containers that are then placed within a framework that is mounted to a wall.  GSky has some nice home-sized versions of this style.

Advantages: Usually cheaper and easier to care for since plants can easily be removed to change the display seasonally or to remove unhealthy plants.

Disadvantages: Plants may dry out faster and also may become too big for container.

Type 2:


Peat-Based-Systems us plants that are removed from their containers and planted into a vertical structure that contains a peat-based potting mix. BrightGreen has a neat animation to show how this system works. I think it must be in Flash, though, because I wasn’t able to see the animation on my iPad, but can see it on my computer.

Advantages: Plants can be replaced easily and the potting mix will hold onto nutrients and water.

Disadvantages: Potting mix can be messy and can also breakdown within a year or two and need replenishing.

This peat-based-system is the type of vertical garden panel that we created in class. This photo shows it as I was starting to plant it.


Type 3: 


Hydroponic or “Hybrid-ponic” systems are planted into a soiless media, except for what is contained in the plant plug, and require an irrigation system to provide water and nutrients. Sage Vertical Gardens has some that use this system.

Advantages: Can be more permanent since the media breaks down slower than soil or peat and the irrigation system can provide water and nutrients as the plants age.

Disadvantages: Usually costs more to install and requires larger amounts of water since the media doesn’t hold onto the moisture. PH and nutrient levels have to be monitored carefully – you pretty much have to fertilize every time you water.

This is the type of system that Longwood Gardens uses for their living green wall. Here is a close-up of their living wall that shows this type of system. If you look closely you can see they are trying about three different media here since they discovered the media they were using was breaking down too quickly. The irrigation system runs horizontally across the top of each panel.


The man who is credited with starting living walls is Patrick Blanc. His style is more naturalistic then the geometric styles that you will often see. And yes, he has green hair.

After we learned about the different types of living walls, we went to see Longwood’s wall and the plumbing/fertilizing system for it. It is actually the largest green wall in North America.

Many people aren’t even aware of Longwood’s living wall because it is in a hidden area where the bathrooms are. Is this not the most beautiful bathroom area you’ve ever seen?


We learned a lot about the planning, growing, and installation of Longwood’s living wall. It was a huge undertaking. It debuted in 2010.

Longwood’s living wall is composed of 47,000 green, low-light plants. There are a lot of different types of ferns here, as well as spike moss, spider plant, philodendron, ivy, and lipstick plant.

When they first installed the living wall, the employees were told to remove the red blooms of the lipstick plant because the red was distracting. Now they just leave them. I think it’s kind of fun to hunt for them in the mass of green.


One side of the wall gets more sun than the other and also the top of the wall tends to grow the fastest. The bulk of the work that is done on this wall is pruning and keeping the plants tidy.


They spray a white paint-like substance on the top windows to help provide some shade for the plants.


This lovely Maindenhair fern is one of the plants that are a part of Longwood’s living wall.


This living wall has to be monitored carefully for pests. They practice a form of natural pest control by identifying what the pests are that are causing the problems, then buying beneficial insects that will attack or eat those pests. Here are some beneficial insect packets.


We had a rare opportunity to go underground to view the plumbing and fertilizing system. All of the conservatory paths at Longwood have underground passageways. This is the underground passageway at the living wall. Spoooooooky.


Lots of pipes that do stuff down here.


This is the fertilizing system. Sorry for all of the blurry photos. These underground shots were taken with my iPad.


After viewing the living wall and the underground system, we went back to the classroom to make our own vertical panels, as show at the beginning of this post. Our vertical panels contain herbs – sage, rosemary, peppermint, oregano, thyme, sweet basil, parsley, cilantro, dill, and spicy globe basil. We were given a sheet of some great-sounding recipes that utilize these herbs. Can’t wait to try some of those. My vertical panel is currently laying horizontal to allow the plants time to root-in. Then I will find a nice, sunny spot for it.

This class really sparked a new interest and now I am planning a shady wall panel. I’m sure there will be pictures of that at some point here on my blog.

Here is a list of classes at Longwood Gardens. It pays to be a member if you plan on taking classes. Each year they also offer some lectures that are free to members. It sure is fun learning new things!


Friday, January 24, 2014

Garden Classes I’ll be Taking This Year

As you know, I love taking classes or workshops on various garden topics each year. My schedule has been more tight the past year or so due to the web design night classes I’ve been taking and will continue to be so as I work towards my certificate. I will be fitting in a few interesting one-day workshops at Longwood Gardens.

Ideas for Impact
Longwood has been doing this full day of garden lectures the past few years in February to “dig” gardeners out of their winter blues. Each year they have different topics and you can do either the two morning sessions or the two afternoon sessions or the whole day. I’ll be doing the morning session this year where their plant experts talk about their favorite plants and where I will get some ideas for creating more curb appeal – learning to create “a more ecologically-friendly and welcoming suburban landscape.” I have only done minor adjustments to the front yard since we moved into this house, with thoughts of doing more. We have a small front yard, though, and could use some ideas. To be honest, I wonder if anything I come up with be doable with all of the enormous tree roots we have in our front yard. It will be a fun morning, though, on a cold winter day.

Vertical Gardening
Vertical gardening and green walls are a big trend right now. I am interesting in learning more about it, how to create one, what kind of plants work best, and how to care for it. We will learn those things in this class, plus take a look at the green wall at Longwood (which is really large and impressive), and plant a small vertical garden of our own. I am really looking forward to this class. I have to wait until May, though.

Handmade Soaps From Horticulture
Alas, I may not get to take this class. It is so popular I am on the waiting list. This class is about learning the basics of “the cold process method of soap making using vegetable oils and herbal additives.” You get to make a batch of soap and bring it home. I always thought it would be cool to learn how to make soap using herbs from the garden. This class isn’t until November, so the fact that it’s already full is an indication of how popular their classes are at Longwood Gardens. You always have to sign up early because they fill up fast. I thought I was early, but apparently not early enough.

There are other classes I would like to take that just didn’t work with my schedule. One in particular I am really sorry I won’t get to take. I have taken some classes in botanical illustration and watercolor and really enjoyed it and have always wanted to take more. (See my “Favorite Classes” post to see a few of my drawings.) Unfortunately, most of them are during the day during the week. Guess it must be popular with retired folks! They are finally offering evening classes March-April and September-November. Unfortunately, I know I will have a lot of homework during those months. It’s too bad they aren’t offering them during the summer because I plan on taking a break from my web design classes this summer.

Longwood Gardens really has an amazing number of classes and workshops throughout the year. I look forward to getting their class catalog every January. The Morris Arboretum offers classes, too, but lately I have found more of interest at Longwood. There is one class I’m considering this year at the Morris Arboretum on making a miniature table garden out of ferns, moss, other small shady plants and wood. That could be fun.

Sunday, June 16, 2013

Digital Garden Photography Class

For the past five weeks I have been taking an online Digital Garden Photography class through Longwood Gardens. It’s my first online class and I didn’t know what to expect or how much I would learn, but it’s been a great experience.

I had taken a photography class in college, however, that was longer ago than I care to admit. Let’s just say that there wasn’t such thing as digital cameras then and I had a used Pentax K1000, a good workhorse of a manual camera back then.  When I moved over to digital in 2005, I never really felt comfortable with the manual settings and wasn’t sure I knew what I was doing anymore. I was a bit intimidated by all of the buttons and settings. I had been looking for a photography class that would go over the basics again, in a digital environment, but was hoping for a garden-related one. Longwood Gardens to the rescue! This class fit my needs perfectly.

Each week we had to watch a video online, then we would have a homework assignment that we would upload by the end of the week. There was a discussion board where we would post our homework pictures and the instructor and other students would comment/critique. We all learned from each other as we read the feedback from the instructor and other students. I would get really excited each week to see what images the other students would post. Everyone has very different backgrounds and experience levels, so it was fun seeing what they would do each week. We would give each person’s photo a star rating (1-5 stars, 5 being the best). 

The first week was learning about equipment selection and camera handling, along with file types and sizes. The second week was about setting up for a shoot and learning about manual settings, exposure, and metering. The third week was compositional techniques. I took this photo of my climbing hydrangea for that assignment. It uses the rule of thirds and negative space. I used a macro extension tube for this shot.

White climbing hydrangea.

The fourth week was about the direction and quality of light, such as using back lighting, side lighting, or diffused lighting. When I read this assignment, I knew I wanted to shoot my smokebush. When it’s not too hot or too cold, I drink my coffee on the back porch in the mornings. I am always amazed at what the morning light does to the leaves of the smokebush. It makes it look like they are different colors, have a translucency, and the leaves and stems create dancing shadows on other leaves. I wanted to try to capture that. It took me three different mornings of shooting to feel like I got a good enough picture that captures what I wanted it to. It’s still not perfect, but what is! This assignment was the turning point for me in the class. I feel like I learned a lot about composing a shot, shooting from different perspectives, and shooting at different manual settings. I finally started to feel like I understood my digital camera and its manual settings. Everything started to “click” in my head.

Smokebush.

The fifth week was about capturing the “mood” of color. I decided since this was the last assignment, I wanted to practice everything I learned about set-up, composition, and light and combine it with color. I packed up my camera equipment and tripod and took a field trip to the Morris Arboretum. I knew there would plenty of subjects there. I ended up concentrating mostly on Love-in-a-Mist, Red Hot Poker, and some peach-colored roses. For this assignment, I chose to use the Red Hot Poker since it screams analogous color (colors that are next to each other on the color wheel) and gives a sense of being sizzling hot and happy! This was my only image to get a four star rating from my classmates. The others had gotten three stars.

Red Hot Poker (Torch Lily).

The last thing we had to do was upload four images as a “portfolio” of our best work from the last few weeks. I decided I wanted to use images the instructor hadn’t seen before. For the first image, I included one that I had taken earlier in the class when I was experimenting with my macro and the light on my smokebush. I included this because I had originally really liked it, although I see all of the flaws in it now based on what I learned about my manual camera settings. I still really like the way the shadow of the flowers are on the leaf, though.

Smokebush flowers and leaves.


The following are all images that I had taken at the Morris Arboretum and that I included in my final portfolio. I feel like they show that I finally am understanding my camera better, as well as lighting and composition.

These are lovely peach-colored roses with a dark purple smokebush in the background. The shadows became black, really making the graceful flowers jump out at you. I love that there are a few water droplets on the one leaf.

Peach roses and smokebush.


This image is of Love-in-a-Mist seed pods and is more of a monochromatic color scheme with all of the greens. Love-in-a-Mist is a gorgeous annual. It’s a double-whammy because not only does it have interesting, beautiful flowers, but also these fascinating seed capsules. You can see a bit of spider web in this shot. I really like the back-lighting in this image.

Love-in-a-Mist seed pods.

This is probably my favorite photo that I took during this class. It is the Love-in-a-Mist flower and is another example of analogous color. I love the lighting in this shot and how the multiple pistils in the center are shadowed on the flower petals. This is a truly fascinating flower. I actually planted some in my garden this year and they are just leaves right now. I hope mine actually blooms and forms seed capsules so it self-seeds.

Love-in-a-Mist


I learned a lot over the past few weeks, more than I thought I would. Will I break out the tripod and carefully compose every shot I take for my blog from now on? No, no I won’t. I just don’t have the time for that. But it will having me look at my garden differently and trying shots like these more often.

I want to give a shout-out to my instructor, Jon Cox, for all of his valuable feedback during this class. Thanks, Jon! You can see what a talented photographer he is if you check out his website: www.jonathancoxphotgraphy.com.